Change IP Address in Windows Environment
Changing the CruzOC software IP address
A simpler alternative to changing properties is to use the ipaddresschange script. If you install this application on a machine on one network, then move your machine to another network and the IP address from your original network remains hard-coded. For the software to function correctly, you must change the application’s IP address to reflect the new network. Once you have connected the windows application server machine to the new network, below are the steps to change the IP address.
GETTING STARTED
• Backup the Server
SHUTDOWN APP/WEB SERVICES
-
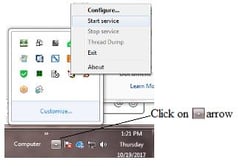
From the Windows Tray, Right-click on APP Server Icon
 > Select Stop
 -
Right-click WebServer Icon
 > Select Stop


CHANGE IP ADDRESS
-
Open a command shell
Start >Run cmd (in Windows)
-
View Servers IP Address
Cmd > ipconfig
Ethernet adapter Local Area Connection:Connection-specific DNS Suffix . :
IPv4 Address. . . . . . . . . . . : 192.168.52.21 -
Set the Environment
Cmd > oware
-
Change IP Address
Cmd > ipaddresschange -n [New IP Address] -
Restart APP and WebServer
-
From the Windows Tray, Right-click on APP Server Icon
 > Select Start
 -
Right-click WebServer Icon
 > Select Stop

